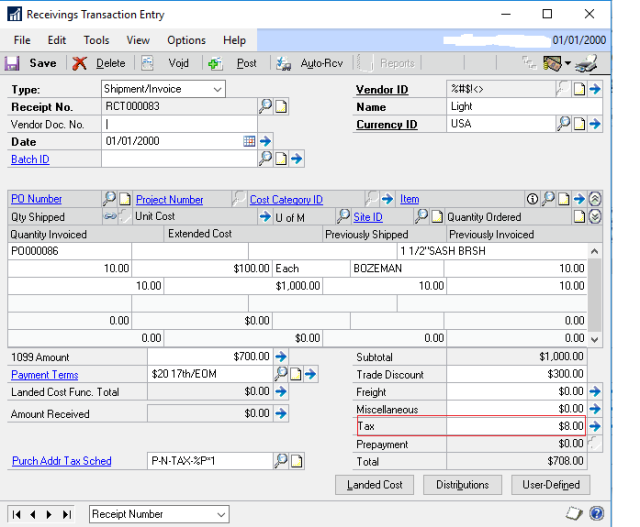
Error Tax amount is not receiving from PO Order to Receivable {Shipment/Invoice} Entry.

Hi All, hope all of you are good.

Today i am going to discuss about tax amount is not display from PO order to receivable transaction. Please follow the bellow work around.

Step1: Verify the Vendor with Tax Schedule ID:

Vendor

Step 2: Click on Tax Schedule ID details

Tax Schedule Detials

Step 3: Create a PO Order and once you entered all details, the Tax amount will automatically calculate as shown in below screen shoot. I want you to check the Purch Add Tax Sched which is in marked.

PO1

Step4: For Verification , please click on next to Tax amount arrow mark.

PO2

Step5: And by verifying in Item Detail Entry window we able to see the Purch Add Tax Sched details, please follow the below image.

PO3

Step6: Now click on action button to receive and Invoice PO Items.

PO4

Step7:  If we wanna verify the tax detail information then please click on Next to Tax amount Arrow mark verify the same tax schedule id is carry forwarded.

PO5

Here we go with all fine…… Please let me know if u have any comments and reviews i really appreciate it.

Posted in Uncategorized | Leave a comment

A get/change operation on table ‘Batch_Headers’ could not find a record.

Hi ,

Hope all of you good…..

As my today task i got an error like “A get/change operation on table ‘Batch_Headers’ could not find a record.” i was searching in google to complete the issue.

Some of blocks will help me on that …….Very small solution for this.

Please navigate the path: MS Dynamics GP–>Tools–>Maintenance–>Check links

By the open window we can select the series of module and process ,.

My issue has gone out.

Hope this will help you….

Thanks

Nizamudeen syed.

Posted in Uncategorized | Leave a comment

How to create New User with out login as user SA and create through Power user

Hi Guys ,

Today i completed one small and interesting task hope this will help you all.

Please check the user which is created without  login user as “sa”, we need to follow the steps to create new user.
1 ) For example i took the login details as  Nizam and logined in to GP. As Nizam is already a power user  in Dynamics GP.
2) Before creating New user without “sa” login , we need to follow one more step like go to the  Microsoft SQL Server Management Studio.
Now, proceed to assign the user login to the sysadmin role in SQL Server. Open Microsoft SQL Server Management Studio, open the Security folder, open the Logins subfolder.


3) Click the Properties  and select the  Server Roles page.And please check the “sysadmin“, click ok
4) Now please login in to  GP as anish user and Create New user and give Access,security and Roles to the New user.
Please let me know any queries .

Thanks

Nizamudeen

Posted in Uncategorized | Leave a comment

Microsoft Dynamics GP 2010 – Modified Dictionary Upgrade

Hi All,

By Reference of Sarah i have resolved issue.

https://community.dynamics.com/gp/b/dynamicsgp/archive/2013/04/11/modified-dictionary-upgrade

This link will help you out..:)

Thanks

Nizam

Posted in Uncategorized | Leave a comment

Error message when you try to log on to Microsoft Dynamics GP: “This login failed. Attempt to log in again or contact your system administrator”

The below link was helped my issue.

https://support.microsoft.com/en-us/kb/919345

Hope this will help you all.

Posted in Uncategorized | Leave a comment

Create a Customer in Dynamics GP 2010 using eConnect

A few days ago I created a simple example to create a vendor in Dynamics GP using eConnect. I received a few requests to show a sample integration to create new customers. Creating new customers in Dynamics GP via eConnect is a common request and usually proceeds the creation of other receivables documents.

The sample below creates a new customer using the eConnect .NET assembly and in-memory serialization.

To run the following code on your machine:

  1. Install the latest version of the eConnect 11 SDK.
  2. Create a new Console Application in Microsoft Visual Studio.
Add references to these dynamic link libraries which are located by default in C:\Program Files (x86)\Microsoft Dynamics\eConnect 11.0\API\. (Ignore the x86 if you are using a 32-bit system.)
  1. Microsoft.Dynamics.GP.eConnect.dll
  2. Microsoft.Dynamics.GP.eConnect.Serialization.dll
Replace the Program.cs class in the project for the new class below.

using System;
using System.IO;
using System.Xml;
using System.Xml.Serialization;
using Microsoft.Dynamics.GP.eConnect;
using Microsoft.Dynamics.GP.eConnect.Serialization;

class Program
{
    static void Main(string[] args)
    {
        Console.WriteLine("Beginning integration test.");

        using (eConnectMethods eConnectMethods = new eConnectMethods())
        {
            try
            {
                Console.WriteLine("Creating a new customer.");

                // Modify the connection string for your environment.
                string connectionString = @"data source=localhost; initial catalog=TWO; integrated security=SSPI";

                // Create the customer.
                taUpdateCreateCustomerRcd customer = new taUpdateCreateCustomerRcd();
                customer.CUSTNMBR = "TEST001";
                customer.CUSTNAME = "Test Customer";

                // Assign the customer to a new master customer type.
                RMCustomerMasterType customerMasterType = new RMCustomerMasterType();
                customerMasterType.taUpdateCreateCustomerRcd = customer;

                // Assign the master customer type to a new collection of master customer types.
                RMCustomerMasterType[] customerMasterTypes = { customerMasterType };

                // Serialize the master vendor type in memory.
                eConnectType eConnectType = new eConnectType();
                MemoryStream memoryStream = new MemoryStream();
                XmlSerializer xmlSerializer = new XmlSerializer(eConnectType.GetType());

                // Assign the master customer types to the eConnectType.
                eConnectType.RMCustomerMasterType = customerMasterTypes;

                // Serialize the eConnectType.
                xmlSerializer.Serialize(memoryStream, eConnectType);

                // Reset the position of the memory stream to the start.              
                memoryStream.Position = 0;

                // Create an XmlDocument from the serialized eConnectType in memory.
                XmlDocument xmlDocument = new XmlDocument();
                xmlDocument.Load(memoryStream);
                memoryStream.Close();

                // Call eConnect to process the XmlDocument.
                eConnectMethods.CreateEntity(connectionString, xmlDocument.OuterXml);

                Console.WriteLine("Successfully created customer {0}.", customer.CUSTNMBR);
            }
            catch (Exception ex)
            {
                Console.WriteLine("Exception occured: " + ex.Message);
            }
            finally
            {
                eConnectMethods.Dispose();
            }
        }

        Console.WriteLine("Integration test complete." +
                           Environment.NewLine +
                           Environment.NewLine);
        Console.WriteLine("Press <Enter> to continue...");
        Console.ReadLine();
    }
}
Execute the project and you should see the following output:

And you should see the vendor created in Dynamics GP:

Refence by 

Posted in Uncategorized | Leave a comment

Adding DrillDown Option in SSRS Report

PLease check it up below link ,it will help you ,how to add Drill Down Button in SSRS.

Hope you enjoy with this.

Posted in Uncategorized | Leave a comment

You receive an error message when you try to access, to enter, to save, to print, or to post transactions in the Sales Transaction Entry window in Microsoft Dynamics GP

SYMPTOMS

When you try to access, to enter, to save, to print, or to post transactions in the Sales Transaction Entry window in Microsoft Dynamics GP, you receive one of the following error messages:

A get/change operation on table <table_name> failed accessing SQL data
A get/change operation on table ‘SOP_HDR_WORK’ failed accessing SQL data
A get/change operation on table ‘SOP_LINE_WORK’ failed accessing SQL data
A save operation on <table_name> cannot find the table
A remove operation on <table_name> failed accessing SQL data
A get/change operation on table ‘SOP_HDR_HIST’ failed accessing SQL data

Note The <table_name> placeholder represents the actual table name.

CAUSE

This problem occurs if a Sales Order Processing table contains damaged or duplicate records.

RESOLUTION

To resolve this problem, follow these steps.

Run the Check Links procedure

  1. On the Microsoft Dynamics GP menu, point to Maintenance, and then click Check Links.
  2. In the Series list, click Sales.
  3. In the Logical Tables list, click the table that appears in the error message that you received.
  4. Click Insert, and then click OK.
  5. If you are prompted to print the Error log, select a destination, and then click OK.

    Note For more information about table names, use the Resource Descriptions window. To open the Resource Descriptions window, point to Resource Descriptions on the Tools menu, and then clickTables.

  6. Perform the action that caused the error message that you received.

If you still receive the error message, follow these steps.

Re-create the auto procedure

  1. On the Microsoft Dynamics GP menu, point to Maintenance, and then click SQL.
  2. In the Database list, click the company database, and then click the auto procedure that you want to re-create.
  3. Click to select the Drop Auto Procedure and Create Auto Procedure check boxes, and then clickProcess.
  4. Perform the action that caused the error message that you received.

If you still receive the error message, follow these steps.

Re-create the table

To re-create the table without deleting records that are in the table, use the Toolkit. The Toolkit is a tool in the Professional Services Tools Library.

For more information about the Professional Services Tools Library (PSTL), use one of the following options:

Customers:
For more information about PSTL, contact your partner of record. If you do not have a partner of record, visit the following web site to identify a partner: Microsoft Pinpoint

Partners:
For more information about PSTL, visit the following web site:

https://mbs.microsoft.com/partnersource/downloads/releases/noam_pstl.htm

To re-create the table, follow these steps:

  1. Exit Microsoft Dynamics GP.
  2. Back up the Microsoft Dynamics GP code folder.

    Notes

    • By default, the Microsoft Dynamics GP code folder is in the following location:
      C:\Program Files\Microsoft Dynamics\GP
  3. Install the Professional Services Tools Library.
  4.  Start Microsoft Dynamics GP.
  5. When you are prompted to include new code, click Yes.
  6. Add the Professional Services Tools Library to the Shortcuts area. To do this, follow these steps:
    1. In the Shortcuts area, click Add, and then click Other Window.
    2. Expand Technical Service Tools, expand Project, and then click Professional Services Tools Library.
    3. Click Add, and then click Done.
  7. In the Shortcuts area, click Professional Services Tools Library.
  8. When you are prompted to enter registration keys, click Cancel.
  9. Click Toolkit, and then click Next.
  10. Click Recreate SQL Objects, and then click Next.
  11. In the Series list, click Sales.
  12. In the Table list, click the table that appears in the error message that you received.
  13. Click Recreate Selected Table, click to select the Recreate data for selected table(s) check box, and then click Perform Selected Maintenance.

    Note If the table has a custom trigger, you must manually re-create the trigger.

  14. Perform the action that caused the error message that you received.
MORE INFORMATION

If you still receive one of the error messages that is described in the “Resolution” section, try these troubleshooting suggestions.

  • Create a Dexsql.log file, and then locate the error message that you received in the Dexsql.log file. The data that comes before the error message may help you determine the cause of the error message.

    For more information about how to create a Dexsql.log file, click the following article number to view the article in the Microsoft Knowledge Base:

    850996 How to create a Dexsql.log file for Microsoft Dynamics GP
  • Determine whether the error message that you received is caused by a particular report. For example, if you receive the error message only when you print a particular order or invoice report, the problem may be caused by this report. In this situation, restore the Reports.dic file from a backup copy.

    Notes

    • By default, the Microsoft Dynamics GP Reports.dic file is in the following location:
      C:\Program Files\Microsoft Dynamics\GP
  • Determine whether the error message that you received is caused by a modified report. To do this, print the original report. If you do not receive the error message when you print the original report, re-create the Reports.dic file.

    For more information about how to re-create the Reports.dic file, click the following article number to view the article in the Microsoft Knowledge Base:

    850465 How to re-create the Reports.dic file in Microsoft Dynamics GP
  • Determine whether the error message that you received is caused by a particular user ID or workstation. To do this, start Microsoft Dynamics GP on a different workstation. Log on by using the user ID that was used when you received the error message. If you do not receive the error message, reinstall Microsoft Dynamics GP on the workstation on which you received the error message. If you do receive the error message on another workstation, the problem may be caused by the user ID. In this situation, create a new user ID.
  • Determine whether the error message that you received is caused by a particular document number. If you receive the error message only when you use a particular document number, delete this document number. Then, reenter it.
  • If you imported the data, manually enter a document in the Sales Transaction Entry window. If you do not receive the error message, the problem may be caused by the import process.
  • Determine whether the error message that you received is caused by a customization or by a third-party product. To do this, disable the customization or the third-party products.
  • Verify that the Open Database Connectivity (ODBC) data source on the workstation is set up correctly.
  • Determine whether the table contains damaged information. To do this, run the following statement in SQL Query Analyzer. Then, verify the records that are returned.
    Select  * from <table_name>

    Note The <table_name> placeholder represents the actual table name.

For information about technical support for the products that are discussed in this article, visit the following Microsoft Web site:

Posted in Uncategorized | Leave a comment

Great Plains Error – A get/change first operation on table ‘coProcess’ failed

1. Log in to Microsoft Dynamics GP as sa user.
2. Click the Tools menu, click Setup, and then click User.
3. Click the user who is receiving the error message. Make sure that you can successfully access this user.
4. On the Tools menu, click Setup, and then click User Access.
5. Select the user who is receiving the error message. Then, click to clear the User Access check box for the new company.
6. On the Tools menu, click Setup, and then click User Access.
7. Click to select the User Access check box. Give access to the new company to the user. Do this for all users who are receiving the error message.
8. Run the Grant.sql script against the company that is experiencing the problem. Also, run the script against the DYNAMICS database.

Notes” In Microsoft SQL Server 2000, run the script in SQL Query Analyzer. In Microsoft SQL Server 2005, run the script in SQL Server Management Studio.
” The Grant.sql script is located in the following path:
%Program Files%\Microsoft Dynamics GP\SQL\Util

Posted in Uncategorized | Leave a comment

Error message when you try to delete a user record that is stuck in the User Activity window: “Get Change Operation on SY_Current Activity Record Was Already Locked”

SYMPTOMS

When you try to delete a user record that is stuck in the User Activity window in Microsoft Dynamics GP or in Microsoft Business Solutions – Great Plains, you receive the following error message:

Get Change Operation on SY Current Activity Record Was Already Locked
RESOLUTION

To resolve this problem, delete the record that is associated with the stuck user from the ACTIVITY table by using SQL Server Management Studio or SQL Query Analyzer.

To delete the record from the ACTIVITY table, follow these steps:

  1. Determine the userid of the user who is stuck by viewing the User Activity window. To do this, follow the steps for your version of the program.

    Microsoft Dynamics GP 2010 or Microsoft Dynamics GP 10.0

    On the Microsoft Dynamics GP menu, point to Tools, point to Utilities, point to System, and then clickUser Activity.

    Microsoft Dynamics GP 9.0 or earlier versions

    On the Tools menu, point to Utilities, point to System, and then click User Activity.

  2. On the computer that is running Microsoft SQL Server, start SQL Server Management Studio or SQL Query Analyzer. To do this, follow the steps for the program that you use.

    SQL Server Management Studio 2008 or SQL Server Management Studio 2005

    1. Click Start.
    2. Click Programs.
    3. Point to Microsoft SQL Server 2005 or to Microsoft SQL Server 2008, and then click SQL Server Management Studio.
      Note The Connect to Server window opens.
    4. In the Server name box, type the name of the instance of SQL Server.
    5. In the Authentication list, click SQL Authentication.
    6. In the User name box, type sa.
    7. In the Password box, type the password for the sa user.
    8. Click Connect.

    SQL Server 2000

    1. Click Start, point to All Programs, point to Microsoft SQL Server, and then click Query Analyzer.
    2. In the Server name box, type the name of the instance of SQL Server.
    3. In the Authentication list, click SQL Authentication.
    4. In the User name box, type sa.
    5. In the Password box, type the password for the sa user, and then click Connect.
  3. Make a SQL backup copy of the ACTIVITY table by running the following script.
    SELECT * into DYNAMICS..ACTIVITY_BAK from DYNAMICS..ACTIVITY
  4. Run the following script against the DYNAMICS database.
    DELETE DYNAMICS..ACTIVITY WHERE USERID = '<XXX>'
    

    Note Replace <XXX> with the userid that you want to remove. For example, run the following script:

    DELETE DYNAMICS..ACTIVITY WHERE USERID = ‘John’
  5. Start Microsoft Dynamics GP.
  6. After you verify that the user was removed successfully from the ACTIVITY table, and you can log in successfully, run the following script to drop the backup table that you created in step 3.
    DROP table DYNAMICS..ACTIVITY_BAK


    Reference by Microsoft Dynamics
Posted in Uncategorized | Leave a comment